Tuesday, December 29, 2009

Wrenching Times (design binding part 1)


....my first real design binding in a while, and some real meat to sink my teeth into.


 "Wrenching Times"- a selection of Walt Whitman's civil war poetry from "drum taps".
Printed by Gwas Gregynog Press, in 1991 - 20 years ago !! - and masterfully illustrated with wood engravings by Gaylord Shanilec.


5 years of a steady diet of ken burns, david mcullough , et al...I'm ready to give it a go.


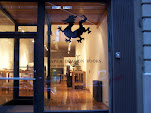
First, the ends, constructed in a variation on no.13 of Arthur Johnson's Thames and hudson manual.

The idea was to capture something of the essence of the book, and thereby set the design off on the right footing, giving the binding a heart around which the rest of the body is built.


I came across a photo archive in the library of congress available for viewing and reuse by the general public, and then found some very famous images from the civil war taken by pioneering photographers Thomas Roche, and Matthew Brady.(definately a usefull tool for the future- thanks dimmy)


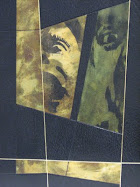
The images selected, have been then printed on zerkal, from half-tone polymer plates, that have been cut-up prior to printing.
Then Monoprinted with wood veneer strips, and finally coloured with acrylics.
The idea with colouring was to obscure the edges and surrounding areas, and create a kind of pocket of light around the main image.  My thanks are extended to my new buddy, Mindy Beloff at Intima Press who helped me get the plates made, and for letting me use the studio to print. Mindy is a very knowledgeable letterpress printer and book artist, and she runs pretty cool classes out of her studio at Union Square. I have included her link in our friends of Paper Dragon Books on the right side.
Tone is set, the forwarding can continue.............

Tuesday, December 22, 2009

Happiness is....


...a warm pair of boots, and a full press!

We (and by we, I mean me and denise) would like to join with everyone to unanimously say...
"goodbye 2009, you will not be missed."
It's been a tough year for everyone, but for us ...lets just say all work produced this year was done so without the aid of heat.All I will say about that is that it is no fun trying to make books and boxes at 40 F.
Somehow we survived, and we all made it through.....2010 will be much, much better
I promise.

Watch this space over the next month, and you will see me make my first real design binding in years!

Wednesday, November 18, 2009

The Box Challenge - The Wall


...so the method is this.
take a title, and write down some ideas.
make drawings from those ideas.
re-draw or develop pattern or idea.
put them on the wall and choose.
Click on the image twice to magnify...blogger has made some changes..

Monday, November 9, 2009

The Box Challenge - Vanishing point


exercise..

The Box Challenge - pattern work


gouges,fillets and wheels....

The Box Challenge - a paris...


...this was fun

Saturday, November 7, 2009

The Box Challenge - Results - Round 2


....more boxes, and more to come.

Sunday, October 18, 2009

The Box Challenge - Surface Gilding


I don't know...it seemed appropriate and pretty easy enough to do .
French pale,rosenoble and fine gold.

Tuesday, October 13, 2009

The Box Challenge - results - round 1


As promised
The first batch of 10 from last week
...lots of onlays, tooling, handlettering,a bit of gold work , some eggshell and some printing =
2 days design work
2 days tooling patterns
5 days dying, paring,printing, and applying goatskins
5 days final tooling in gold and foils
...another fitzgerald...I was going for stained glass...

Friday, October 9, 2009

Eggshell panels (part 2)


Having sanded the panel to a smooth glass like finish, you can colour them and finish with a double coat of shellac(sanding inbetween , of course!).This can be then buffed to high gloss, on the book.
I coloured mine just slightly, using red, blue and yellow dyes.
I have worked panels into shapes and curves before, but it is a great deal of work, and requires different prep.,so while some may rightly think the design lazy....expediency is the key to getting the job done.
IE The Great Gatsby.....east egg .....west egg ..... eggshell panels.... job's'a gudden ....next!
The panels are cut on the board chopper, and recessed onto the case, then worked into a pattern of basic lines, black onlays, and a little gold.I apologise for the quality, I literally had minutes to take them.
This is one method of making an eggshell panel.There are others.....
I will be posting the results of the finished boxes , every 2/3 days...
To come...surface gilding.

Saturday, October 3, 2009

Box challenge Day 50..D-Day approaches...


So...the first batch will be out this week,and pics will be shown when finished....
It rained all day, while I was tooling, but the weather broke around sunset, and the light came raking in across the park lighting up my own tree silhouettes(more block printing..I will have start something new soon!)I took a picture... the top left corner of the view..It's not a mocking bird but it was out there.... all on its own!!
it was a good day
Part 2 of the eggshell monday

Sunday, September 13, 2009

Box challenge day 35 / Eggshell panels part 1


Jean Dunand(1877-1942) is credited with first using lacquered eggshell panels in furntiture and bindings.
I was lucky enough to be around to see one of my old teachers make a
panel, and consequently I have another trick I can use.(thanks Mark!) Glue the eggs on to
a rough black paper, grout it with black gesso, sand, and sand, and sand, until the surface is as smooth as glass, or thereabouts...
Part 2 will include colouring the panels , sealing with a lacquer, and mounting as a recessed onlay onto the cover for "The Great Gatsby".

Tuesday, September 8, 2009

Box challenge DAY 28


...now this is not the traditional box you will see many trade binderies producing.That box is made in 2 parts, this one is in 3.
Of course I think this box is stronger,functions better, and looks more polished.
Stress at the joints is divided by the form(inside joint) and the case(outer joint), rather than having 1 piece do all the work.
The head and tail are turned-in over a square vellum/goat head cap, forming a snug trap into which the form will be glued in.
I essentially treat the box as if I am casing-in a leather case binding.
That is, when "putting the back in", I set the joint with a backing board, and leave in a "fence" in order to keep the board at 90 degree angle to the form.
One word about the joints.....
I want to put the joints down with the board open at 90 degree angle to the spine...just as in casing-in a leather bound book.
The boxes left overnight to dry can be cased-in the following day,trays, joints, linings etc....
I have found that putting the joints down this way increases the flexibility of the box, whilst also relieving the tension at the inside joints.This will also prevent the boards from pulling off the spine and pulling the box open when cased-in and standing up.
Boxes with the joints put down in this manner, can be opened all the way backwards so that the foredges of the board touch with no danger that the joint will split.
Now no-one is going to be opening boxes like this, but the added flexibility is a bonus, and can only extend the life of the box.
NB ...also this is the last point you will have to make sure your boxes will stand-up straight, catch the ones that are going to be a problem and fix them.If you don't see it now, you won't discover it until the box is finished.....and thats never good!
so to recap....casing in this way will ensure your boxes stand-up straight and stay shut!!!
Which is what we all want ...basic requirement!

Friday, August 28, 2009

Box challenge DAY 21


...........62 trays cut and covered-31 rounded forms covered in goat split to 0.3, with 31 spine pieces cut-62 boards cut , back-cornered, and sanded-31 covers split to o.75 , cut and pared.
Case making to follow, but somehow I appear to be a week behind!

Tuesday, August 18, 2009

Box challenge DAY 14


Day 14...board linings and rounding Spine forms.

......the boards cut from an 80pt, or 3mm board, are lined with a smooth bristol board on the outside using PVA.
Now, because we're using these for making leather cases, and because those cases are covered in onlays, I paste and stretch an acid neutral cotton fibre 25lb bond paper across the board, which initially pulls them inwards, but will later help the boards set rigid and flat.
I can't cut the material for making the rounded Spine Forms without first lining the boards as a true measurement can only be taken with the trays between boards.
I use BINDERS BOARD to make the rounds!!!Not Balsa, Not paper,not toilet rolls!!!
It is readily available, easily sculpted in the right hands, and provides a good solid back to the box,structurally sound and good for tooling.
Different strokes for different folks!!
The base board is cut to the width of the trays between boards, then built up by successive possibly thinner boards, in a pyramid.These are glued together, then rather perversely I hand plane them into curve using a kraft knife.
Its not for everyone, but I do like the control it gives me.
After planing, they are then sanded with a 30, 50, or 80 grit sand paper.Use a heavy paper and wear a mask.
These will then be covered, and after that the spine pieces for the cases can be cut, and cases made....over 30 of them......easy, right????!!!
The bristol board and lining paper is available and affordable from Hollinger's, I will post a link in the list of freinds.

Friday, August 14, 2009

Box challenge DAY 10


End of the 1oth day..over 70 trays cut and covered, and lined.
Forms are cut out of scrap board, cut to fit inside the bottom tray.These will be used later in pressing the trays onto the case.
I now cover the forms in an envelope of wax paper to prevent the build-up of hard-to-clean dust and dirt.I don't use wooden blocks as I just prefer to custom cut each form for each box.
A card is wrapped around the bottom tray,again to prevent friction,give "memory" to the walls, so that they dry firm and straight.
Boards were cut, then all was stacked and left to dry.
Some of the boxes are for small items, so the bottoms are "built-up" using a combination of board and foamcore, giving a balance between weight,and structural integrity.
The box for "The Third Man" houses 2 books, the smaller one in a slipcase built-in to the bottom tray, which is made to fit the bigger book, so it can sit in a tray on-top.The lower book can be pulled out with a ribbon.
To come.....board lining, and the hard labour of making the "rounds"...and I've not even touched a piece of goatskin!

Saturday, August 8, 2009

Box challenge DAY 3


Day 3

Bottom trays are covered and a timely delivery from Ernie Schaeffer means that we can cut board for the tops.
Next week we will be making the round forms for the boxes, but the real test will come in gathering enough goatskins to fill the order.....

Wednesday, August 5, 2009

Box challenge DAY 1


I got put on the spot, a 2 month deadline to complete 25-30 full leather design clamshells.
Nothing like a bit of pressure...right??
This will be first, a serious test of edition work, and second, a design endurance nightmare.
So...just for added spice, I thought I'd do it in public, detailing most steps, where possible, along the way.

Design conception and execution will be left to me.

DAY 1
.........Bottom tray cutting for double-walled clamshell.The base is cut, then the walls cut and glued together in a step-joint of a board thickness.(all clamshells made at PDB are double-walled,thin walls are useless)
The trays are made, sanded smooth, then the outside is lined, for extra strength and stability.

Next step.....covering.....

Saturday, August 1, 2009

Mosaic Onlay


I love my micrometre.
It is the only way to ensure a good, consistent onlay, and the first picture demonstrates the thickness I have found to work best for onlays.Full goatskins used for covering upto certain sizes I now get split to .7-0.75 ...I have found the 0.6 most people get it split to is just too thin, and may compromise strength.
The mosaic style of dying, cutting-out,and onlaying in a grid or other pattern, is a technique worth further exploration....

Wednesday, July 1, 2009

Waterfront - never take the short-end money


"It wasn't him, Charley, it was you.
Remember that night in the Garden you came down to my dressing room and you said,
"Kid, this ain't your night. We're going for the price on Wilson."
You remember that? "This ain't your night"! My night!

I coulda taken Wilson apart! So what happens? He gets the title shot outdoors in the ballpark and what do I get? A one-way ticket to Palooka-ville!

You was my brother, Charley, you shoulda looked out for me a little bit. You shoulda taken care of me just a little bit so I wouldn't have to take them dives for the short-end money.......

......You don't understand. I coulda had class. I coulda been a contender. I coulda been somebody, instead of a bum, which is what I am, let's face it.

It was you, Charley."

More block printing, and strangely enough, more crucifixes!
Just a coincidence ......
Dyed goat onlays, printed with stills from the movie.In particular, from the famous scene above.

Tuesday, June 30, 2009

Child Of God - complete


Done!
Onlays,tooled in black and gold.

Sunday, June 21, 2009

The Kitchen Sink Design Method


......AKA the Spaghetti method - good for use when you find yourself in a tightspot.In the case of "Child Of God", "A" thought the face was too scary, so I resolved to fragment it somehow, tool over the top.
So....

Directions :

1. Make numerous templates for cover,
drawing in spine.

2.Make colour copies of given material or designs to
be featured, or onlaid.
3.Complete as many covers as possible withing a given time frame
(in this case denise and I gave ourselves 3 hours..)

I also tooled some of the lines in foil, so you could see them better.

This should put yourself in a better position to envisage a final result, and choose which sketch or idea to persue, and or develop.

Any input from any of you out there would be welcomed, but "A" has the final say!!

Its like throwing a bowl of spaghetti against the wall, and seeing which strand is going to stick!!

Sketches are numbered 1-7 in the bottom right..comments welcome, but a decision will be made tuesday latest regardless.

*I missed off some of the no.s but it should be pretty easy to tell how it goes......

Wednesday, June 17, 2009

Block printing on Dyed Goat


It was an exciting day in the bindery today,pure enjoyment!I had set aside today for block printing some dyed goat ready for use in designs.The blocks were carved from a plywood,the goat pared,all I needed was some ink???!!!
My friend and colleague Amber Mccmillan of Post Editions was able to help me out, so jumped on the bike, through flushing, bed-sty,to her new studio, a pleasant space with vandercooks ,a platen press with an amazing flywheel, and a hand operated guillotene.More about Amber and her work in later posts.
The artwork is for "Waterfront", and "Child of god", and both will be completed forthwith......
uhum...yes, that is my face!!

Monday, June 15, 2009

Design en masse, or.....painting by numbers


"1.Mathematics is the language of numbers.
2.Everything around us can be represented and explained by numbers.
3.If you graph the numbers of any system, patterns emerge.

Therefore, there are patterns everywhere in nature."


I am currently involved on a work order that requires design on a large scale, all of which is completed in fine bookbinding leathers,hand-lettered, and hand-tooled.
Volume dictates that I commence and complete a number of designs at the same time, deliver, and start the new batch.The brief dictates, that I must have designs that use the expanse of the front and back covers,concentrating interest on the spines,incorporating art-work form dust jackets, and or my take on the given subject.
Templates are made of the covers, with the spines drawn in , and the designs are penciled onto a lightweight paper.Where necessary the template is tooled over, and blind impressions made, in preparation for onlays.
If there is no Graphic lettering onlaid, care must be taken to leave enough room for the title and author.
Gravity`s Rainbow is a good example of the procedure I now follow.
I started as always with a vague concept(gravity`s rainbow=parabolic trajetory ....so something involving curves, scientific, mathematical drawings etc....)On the first one I made a very basic spiral pattern, using a grid of concentric circles.
Making a design using parabolic curves would be too technically demanding for the time frame.
After looking at a lot of mathematical drawings etc...I decide to do segmented circles,with tooled lines that cross in the shape of a curve(poor mans parabolic curve!!`ish).
I knew the materials and colours I was going to use - the craqueled goat from the last post.
Once I`ve got my idea, a template is made and the pattern drawn out, and tooled onto the cover using my basic set of fillets and gouges.
However, as is wont to happen occaisionally, I came unstuck half-way through,didn`t like the way it was going and didn`t think I could save it.
I begrudgingly continued, and then realised that it kind of worked.The lesson I learned then is that in that situation, it sometimes pays to just grit your teeth and see it through to the end,despite what your instinct might tell you.
It is not finished yet......
Gravity`s Rainbow (no.2), is part of a batch of 10-15 I hope to have ready shortly
I think its probably enough of the craquele though...right??

If you are interested in Divine Proportions, golden sections, rectangles, and spirals...or Pythagoras,Archimedes and Fibbonacci...you might try

"Geometry of Design" (Kimberly Elam)

It examines the existence of divine proportion in many things from seashells, to the human body, and some architecture.I have found it usefull.

Thursday, June 4, 2009

They call it Crack-uele


...no, they don`t really, but it is addictive and very easy to do as explained in the posting "design on the fly".It is easy, a lot of fun, and a quick way to transform a uniform coloured onlay.You will find denise and I carrying out the demo via the link below.
Future demos will be found listed in the categories marked 'Demos",one of three so far, with many more on the way.

There are demos on woodblock printing, and basic onlay to follow.

http://www.youtube.com/watch?v=cCA5fhjUMfA&feature=channel_page