Wednesday, July 1, 2009

Waterfront - never take the short-end money


"It wasn't him, Charley, it was you.
Remember that night in the Garden you came down to my dressing room and you said,
"Kid, this ain't your night. We're going for the price on Wilson."
You remember that? "This ain't your night"! My night!

I coulda taken Wilson apart! So what happens? He gets the title shot outdoors in the ballpark and what do I get? A one-way ticket to Palooka-ville!

You was my brother, Charley, you shoulda looked out for me a little bit. You shoulda taken care of me just a little bit so I wouldn't have to take them dives for the short-end money.......

......You don't understand. I coulda had class. I coulda been a contender. I coulda been somebody, instead of a bum, which is what I am, let's face it.

It was you, Charley."

More block printing, and strangely enough, more crucifixes!
Just a coincidence ......
Dyed goat onlays, printed with stills from the movie.In particular, from the famous scene above.

Tuesday, June 30, 2009

Child Of God - complete


Done!
Onlays,tooled in black and gold.

Sunday, June 21, 2009

The Kitchen Sink Design Method


......AKA the Spaghetti method - good for use when you find yourself in a tightspot.In the case of "Child Of God", "A" thought the face was too scary, so I resolved to fragment it somehow, tool over the top.
So....

Directions :

1. Make numerous templates for cover,
drawing in spine.

2.Make colour copies of given material or designs to
be featured, or onlaid.
3.Complete as many covers as possible withing a given time frame
(in this case denise and I gave ourselves 3 hours..)

I also tooled some of the lines in foil, so you could see them better.

This should put yourself in a better position to envisage a final result, and choose which sketch or idea to persue, and or develop.

Any input from any of you out there would be welcomed, but "A" has the final say!!

Its like throwing a bowl of spaghetti against the wall, and seeing which strand is going to stick!!

Sketches are numbered 1-7 in the bottom right..comments welcome, but a decision will be made tuesday latest regardless.

*I missed off some of the no.s but it should be pretty easy to tell how it goes......

Wednesday, June 17, 2009

Block printing on Dyed Goat


It was an exciting day in the bindery today,pure enjoyment!I had set aside today for block printing some dyed goat ready for use in designs.The blocks were carved from a plywood,the goat pared,all I needed was some ink???!!!
My friend and colleague Amber Mccmillan of Post Editions was able to help me out, so jumped on the bike, through flushing, bed-sty,to her new studio, a pleasant space with vandercooks ,a platen press with an amazing flywheel, and a hand operated guillotene.More about Amber and her work in later posts.
The artwork is for "Waterfront", and "Child of god", and both will be completed forthwith......
uhum...yes, that is my face!!

Monday, June 15, 2009

Design en masse, or.....painting by numbers


"1.Mathematics is the language of numbers.
2.Everything around us can be represented and explained by numbers.
3.If you graph the numbers of any system, patterns emerge.

Therefore, there are patterns everywhere in nature."


I am currently involved on a work order that requires design on a large scale, all of which is completed in fine bookbinding leathers,hand-lettered, and hand-tooled.
Volume dictates that I commence and complete a number of designs at the same time, deliver, and start the new batch.The brief dictates, that I must have designs that use the expanse of the front and back covers,concentrating interest on the spines,incorporating art-work form dust jackets, and or my take on the given subject.
Templates are made of the covers, with the spines drawn in , and the designs are penciled onto a lightweight paper.Where necessary the template is tooled over, and blind impressions made, in preparation for onlays.
If there is no Graphic lettering onlaid, care must be taken to leave enough room for the title and author.
Gravity`s Rainbow is a good example of the procedure I now follow.
I started as always with a vague concept(gravity`s rainbow=parabolic trajetory ....so something involving curves, scientific, mathematical drawings etc....)On the first one I made a very basic spiral pattern, using a grid of concentric circles.
Making a design using parabolic curves would be too technically demanding for the time frame.
After looking at a lot of mathematical drawings etc...I decide to do segmented circles,with tooled lines that cross in the shape of a curve(poor mans parabolic curve!!`ish).
I knew the materials and colours I was going to use - the craqueled goat from the last post.
Once I`ve got my idea, a template is made and the pattern drawn out, and tooled onto the cover using my basic set of fillets and gouges.
However, as is wont to happen occaisionally, I came unstuck half-way through,didn`t like the way it was going and didn`t think I could save it.
I begrudgingly continued, and then realised that it kind of worked.The lesson I learned then is that in that situation, it sometimes pays to just grit your teeth and see it through to the end,despite what your instinct might tell you.
It is not finished yet......
Gravity`s Rainbow (no.2), is part of a batch of 10-15 I hope to have ready shortly
I think its probably enough of the craquele though...right??

If you are interested in Divine Proportions, golden sections, rectangles, and spirals...or Pythagoras,Archimedes and Fibbonacci...you might try

"Geometry of Design" (Kimberly Elam)

It examines the existence of divine proportion in many things from seashells, to the human body, and some architecture.I have found it usefull.

Thursday, June 4, 2009

They call it Crack-uele


...no, they don`t really, but it is addictive and very easy to do as explained in the posting "design on the fly".It is easy, a lot of fun, and a quick way to transform a uniform coloured onlay.You will find denise and I carrying out the demo via the link below.
Future demos will be found listed in the categories marked 'Demos",one of three so far, with many more on the way.

There are demos on woodblock printing, and basic onlay to follow.

http://www.youtube.com/watch?v=cCA5fhjUMfA&feature=channel_page

Thursday, May 21, 2009

Art deco in minutes


....so, as ever, a client came in with prints asking for a full leather binding in a matter of days, and of course I said "no problem!"......
Single sheets were separated into sections, and overcast, rounded and backed, covered, ready for finishing, and because of the tight deadline , the ends were put down, and the book pressed.
This is one time when finishing "on the book",will be an advantage.
The brief for finishing was a little vague
"....do something art deco style...a few lines here and there..."
Its actually not that vague at all, because I knew exactly what she wanted immediately.
One of the simplest patterns in an art-deco style, completed on all objects, from cigarette lighters to buildings, is the old intersecting lines that make random but not random squares and rectangles....!
Now before all you art historians and artists out there gasp in disgust as I reduce a whole art period to a "hack-merchants hand-book :guide to the arts", this situation must be approached in a pragmatic manner.
The situation being the strict timeline, allowing 1 day for the design and completion of the book.
I don't have time to do homework, or an elaborate design using other elements of the period.(fans,concentric circles,geometry!)
From a bookbinders point of view, the easiest thing I can do is something using straight line pallets.So there it is, decided without thinking, the pattern made-up as I went along, which is easy enough with good eyesight and a straight edge.
Admittedly, the design would have been improved with more effort and time, but in times of pressure, you have to know your limitations, pull out a trick, and get it done.
Not an artist and without any formal training in art, so much of designing book covers, whether period or design binding(with the exception book structure),bookbinding for me at the moment seems to be an amalgum of tricks-meaning, the manipulation of materials using methods such as colouring,dying,printing,sanding;then also the completion of pattern work through onlay,inlay and tooling.
The more tricks you learn, the better you become at translating that initial image you get in your head of the way you would like the object to look, into to something that feels finished.(I guess that's common sense)
What I'm trying to say is that you don't have to be born with an aptitude for art to be a good bookbinder, but that through practise, trial and many errors, you can teach yourself to be not only a bookbinder, but an artist too.
This is how I have learned to work.
Just ask my first teacher, who handed me a tube of acryllic paint and told to me use it to colour the edge of my book.Of course, he was extremely amused to see that I had put on a layer of paint a few millimeters thick.....not a clue!!

If you are interested in art-deco bookbinding, you might try this book....

Art Noveau and Art Deco Bookbinding:French Masterpieces 1880-1940
(Alastair Duncan, Georges De Bartha)


Monday, April 6, 2009

gold tooling demo (warning :explicit material)


ok people, so this one's supposed to be just a bit of fun.Abby, if you're out there, boxes are getting cranked out,I promise.
We took video of this tooling to highlight this particular method in use.
However guys, just because it's bookbinding, doesn't mean its all bach and tweed.
If you can get past the soundtrack, its a good demo(apart from the unnecessary headshots).The video is on youtube, the links are at the bottom, and you'll have to cut and paste it in the finder box, you can also adjust the video quality.
Remember, you can't take yourself seriously all the time-keep it real....

http://www.youtube.com/watch?v=-9YCAuxEk_M

http://www.youtube.com/watch?v=OeSWgD7Dh3I

On another note, I've added the ability to subscribe to the blog via e-mail.
Sorry for the bad pic, it's all I had left.

Tuesday, March 31, 2009

Berenger - Finishing


Finally its here, covered, the books are ready for the really fun part(!?!)...Finishing.
Before I get to the prep.work, the best way to proceed is to work out what tools I'm going to use.
I don`t have an ink pad, so I make mock spines and boards, and use foil to mark-up for tooling.
Now I`m not one to blame my shortcomings on my tools, but succesfull period binding depends on having the correct tools for the job.
My fledgling collection certainly is far from complete(3 sets of corner tools , and 3 center tools!!)but a trip downstairs to the ever accomodating Aaron at Talas, soon puts that right.I love now that if I need anything I can pop downstairs and see the neighbours, and I`m sure they don`t mind either.....the jury is out on what Denise might have to say!
On the upside, I think I've been shrewd in choosing the wheels(the wall is almost there!).A lot of Bindings in the 18thcentury are characterised by fat rolls of gold decoration along the edges of the boards,fillets, with centre designs such as harlequins,ovals,varios seals , with some designs covering the expanse of the binding.I know what I`m not doing, that is, any tree-marbling, or onlay work, and there will no pattern made-up of individual hand tools.On the front and back boards I'm going to do a panelled pattern, minus the corner and side tools.I don't have a really fat wheel, but what i do have are wheels, that I can double-up and reverse tool(Doubling the size of the pattern).
When I've worked all that out, it's time to make the parchment size , to be used instead of the paste wash for goat.You can get the parchment scraps by weight from talas, cut them up into bits of approx. 20x20mm , boil them gradually reducing the liquid to a viscous gelatine size, usefull for some edge decoration too.
The books get two coats of the size and two coats of glaire(shellac based).
*nb only prep.what you can handle completing in a day.I split the work in 2 days between boards and spines.When its done, the turn-ins get a Dentelle of the outside wheel doubled again in blind.The ends put down, the books pressed, and finally the boards polished with a wax emulsion.
*nb, you don't need to polish the spines...... you don't......unless you want all that finishing to crack off !
Just in time for the show........

bibliog:"bookbinding"(arthur w johnson)
"the history of decorated bookbinding in england" (nixon and foot)
"james scott and william scott bookbinders"(j h loudon)


Berenger-tight back lining,leather prep and covering


Any of you out there that have questions about how to make a tight-back binding in the flexible style, should really get hold of a copy of Arthur Johnson`s Thames Hudson manual on bookbinding.He gives an itemised breakdown of procedures and the diagrams are easy to understand.
....following on, having had the boards attached and headbands sewn, the spine is to be lined.
My first lining will be of Fray-knot, which moulds nicely to shape of the cords.When it is set, the second lining I use is of an archival British kraft paper(2, or 1, depending on the shape of the spine).
I sand off the paper when dry to reveal inconsistencies, and when thats done its trimmed at the head and tail.
A third lining of goatskin is layed on,the bands sharpened-up, and when dry it is again sanded until smooth.
After all this is complete we`re ready for covering.
I decided to instead of doing what we all do too much of(that is brown and tan calf bindings with sprinkles!and of course the obligatory red labels!)to do something a bit different.For whatever reason, i was thinking a rich deep red or burgundy.Time to whip out the Hewitts dyes and have some fun!
I give myself a head-start by selecting a light plum coloured hewitts calf skin, and get both covers out of the one skin.
I prepare the dye by boiling water, and mixing a little in containers(red and black-I always use black to take the edge off any colour).I dilute with a little cold, then I set about trying to change a rather ordinary cover, into hopefully something with a bit more character!
I unfortunately do not cultivate my own medievil garden, (sorry purists!), so those of you who don`t even have a window box will find the hewitts dye to work well enough.
Covering is next, and I regret that I do not have another set of hands to document the procedure....back-cornering,working in the spine,turning the head-cap in on itself,cornering,setting the joint,etc..etc...etc..

Wednesday, March 25, 2009

Big IS Beautifull


Those of you out there that have had occaision to work on large over-sized books will appreciate the various problems and challenges that the forwarding presents.The boards I got from France two years ago were dissappointing. The rubber biscuits uneccessary and cumbersombe, they were different heights when locked-up, and they were fabricated from poor quality ply-wood. (It is fair to note that this may not indicate the standard of quality offered, and may just have been a one-off slip).
However , I am a fan of the French style, namely boards made with a substantial shelf, gripping the spine approx 1" proud of the cheek of the press , avoiding the undue brutality of pressure, whilst also making it easier to work on the back of the book.
Having been since unable to source large French-style boards fabricated to code, from good quality material, I decided to make my own.
*NB-there are larger boards out there, but made to the english style, and I found that having a more substantial shelf made it easier to position the book in the press.
My freind Josh Harris and I produced many prototypes , and have finally decided on a design , and have produced a couple of finished sets.
The finished board is 20" long by 7" wide , with a shelf 1"x1.5" that sits ontop of the cheeks.The shelf is attached to the main board using biscuits(they`re not just glued on!).The wood used is a beech, 1/4 sawn for strength , and air-dried for the prevention of warping.The boards are also made with a tapered finish, again unlike my french ones. I am unsure if the tapered finish is unique to england(I'm sure it`s not?!), and also whether an un-tapered finish is unique to the French-I suspect that there is no hard and fast rule and there is a lot of overlap.
The boards photographed are made of white oak , this proves an expensive prospect for production.I know Josh is working on using cheaper alternative material such as plain sawn beech, this may prove a winner, and if so I'll sign on, but I will have to wait and see how these would turn out and perform.
The jaws I decided to make in steel , and not brass....Steel is harder to keep clean , but longer lasting, and I guess longevity is more important.
All in all , the boards are a real piece of work , and I'm very happy with the end result.
We decided to offer the boards for sale ourselves, thereby avoiding uneccessary mark-ups from retailers, allowing for a more affordable price.
Again, I must stress that this was not a for profit enterprise, I simply was motivated to produce a good quality tool to the best standard.
We are selling them for $400. Before everyone gasps in disgust, I can confidently state that I am to date unaware of a Backing Board anywhere that comes close to the quality of this one`s fabrication.
Some of you may feel that its uneccessary, and I do agree that they are a luxury for most, especially these days, but I do insist on and attest to the fact that they have made my life easier.
Plus, they're pretty sweet.....

Saturday, March 7, 2009

Berenger board attachment


...The boards .......
I use a thin Mill-board , as I`m going to build it up ,
laminating layers of paper , this will help against
warping .
A technique i learned at LCP , that is specifically
designed for this purpose , involves wrapping the boards over the foredge and spine with paper.
(British archival grey..??)
The folding over the spine area will protect against separation when lacing-in , and I`m guessing the action of stretching the paper across both sides of the board give it and added stability.
*nb.we used hot glue to do this , and they dried a lot stiffer compared to the jade I`m using.
To recap , layer of thick paper , either side , then the archival grey.
When ready to mark -up , having frayed-out the cords , I mark a square on the inside of the boards , and get the boards in position , then mark up the board for punching holes , and cutting wedges.You have all done this before , so , nothing new....the cords come back outside to the front of the , where they are frayed out , pasted down , and hammered-out.One thing to not is that it is important to lace the boards on with some breathing space at the joint , I just make a fence , keep it in , take it out when covering , put it back in when setting the joint.
That`s when having steel , or iron-topped board-chopper comes in handy!
When the inside slips , have been pasted and hammered , you are ready to set the square ,
that is put the boards in the final position that they will remain in , so it`s important to get it right *nb...watch the tail , you want your book to stand-up straight , right??also , you can leave the foredge of the boards uncut , and finish them half way through lacing for extra accuracy , but I did mine before .
Thats it , really , a layer of thick cartridge paper after the boards have set overnight in the press , and we are ready for covering.

Tuesday, March 3, 2009

Berenger rounding and backing


.........following on , today the spines were glued up in the press.It is wise to use a finger to spread the jade in between the raised cords , taking care not to go over the cords - that way movement in the back is not restricted.
....give it about 10 min , maybe 15 , then we can round them . I started using dowels of different sizes , positioned at the foredge , this will encourage a smooth foredge round when hammering the spine(thanks mark).
Once a sufficient round is acheived , we can drop them into the backing boards .I`m going to do them at the same time in two presses , using a set of Relma boards , and my prototype hybrid (french/english)boards that are made of maple .NB the real ones will be from air dried 1/4 sawn white oak(you know who you are)!
Now , I confess , that yes I use the claw of the hammer.Now before all the conservators get ready to dispatch me ...I roll the flat line from the middle to the end on each side . Trust me , its useful , and helps give you good form , and no it in no way damages the spine of the book .
Then i`m ready for the hammer(the line will also prevent doglegging), from the middle out , both ways , then change sides ...or hands , whichever you are comfortable with.
When i`m done I`ll finish it with a folder , and sharpen up the bands , with my band nippers.
A layer of tissue , in this case , not only helps set the spine , but will also give uniformity and compactness to the bands.
Tomorrow , board attachment and headbands.............

Monday, March 2, 2009

Berenger-pulling, repair work, and resewing


Further to the discussion on the list today , about what you can garauntee about a repair or binding , as promised here is the book I mentioned -"The History and Art of Horsemanship" Richard Berenger , who was infact George III`s stable master . Indeed , the dedication in the front of the first volume is a supreme example of servile snivelling of the utmost nonsense

"Sir , nothing could justify my presumption , in thus approaching your Royal Presence with so unworthy an offering as these volumes..............Animated by these motives , I dared to form the ambitious with of laying my labours at your majesty`s feet.......
most devoted..
and most faithful subject and servant...."

Good god the things some people had to do to get a book published back in the day !
The books were given to me having been rebound by the biggest brass necked blaggard this side of the atlantic .Its bad form to critisize other binder`s practices , but this was a special case , I am sorry I didn`t have the presence of mind to take a picture as evidence , ....because if there were a bookbinder and conservator tribunal(and i believe there may be a secret society) , this person would have been dis-barred , dis-robed , and dissmissed!!!!
The spines were cruelly stripped to reveal the raised cord sewing , thankfully confused , they left the text-block alone , made a case binding out of some fake leather bookcloth , and put a stamped foil label on the spine.(Please note that the spine piece was resting on the raised cords.....so there was considerable daylight!!!)Well after that performance , the only way is up right , how can we lose??!
Upon opening the book falls apart , at each section , revealing the extant of the damage , - all outside folios must be repaired both sides , and some insides too , the sewing is shot , the cords crumbling.The whole thing is pulled , and all damaged sections repaired using the university of Iowa repair tissue , which is a very fortunate blending match.Paste is brushed onto a stone , the tissue dipped , and placed over the spines , inside and out . The process is lengthy , runs over a series of days , and only when dry and flat , are they folded , and pressed between boards.
The book is easily collated using the alphabetical marks the beginning of each section , and if that wasn`t enough , each previous page is printed with the next page`s first word-Genius!
Endpapers are made , using a hemp ruscombe mills paper and stained period paper .Then the book is ready for the frame.
The sewing is on five raised cords, pulled guitar-string tight , (for ease of knocking down swell), but already i can see repairing every section has greatly increased the swell .
No problem , the first few sections are sewn in the usual manner , then I start sewing 2-up....
meaning two sections at a time going in and out of two sections above and below each other , so the thread is not doubled-up all the way along the spine.This will cut the swell in half , although you do want to alternate , and not sew the whole thing that way , otherwise the kettle stiches at the head and tail do not get enough support.
The sewing complete , swell pressed out , the books are ready for more forwarding.......
but thats tomorrow......

How do you get to Carnegie hall ???


....so every now and then Carnegie Hall wants to honour someone , usually a donor with very deep pockets , or commemorate a season , lifetime ......whatever the reason I`m glad of it as it means I get to make some nice bindings , stamp their great plates in leaf , and use my first ever and favourite wheel.
The binding is pretty starightforward....a case with inlaid panels , usually red , but this weekend green ... but then comes the finishing...
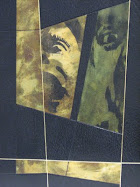
It did admitadly take me some time (good tip coming)to figure out that the best way stamp difficult plates in leaf was to not use anything to hold the leaf in place.This may be pretty obvious to some , but I always have to learn the hard way.The red book is a lot larger , and the plates more difficult . The image of the hall is problematic , due to its size(approx6x9) , its very detailed , and it`s top-heavy , meaning its position underneath the blocker is key to getting a good impression.
The text plate has a large wide band of gold , which is not impossible to clean out with butane , if you are sticking down with vaseline , but it takes nerves of steel.......as does removing , cleaning , and replacing underneath the press , and stamping again.....trust me , it does.
No , the key , is to position under the press , lay the leaf ontop , stamp , and brush out easily using a soft-haired brush - quicker , easier , and just an all round better result.Obvious to everyone but me right?
After stamping , the back of the book is put in , headcaps made , tied-up , and left over night to dry . Then next , a hand rolled wheel across the front and back boards , but first as in the photo , gold is laid down .The tool is then rolled across the gold , and butane is used to clean of the excess , hopefully leaving behind the pattern!!
I chose the wheel as the pattern was simple , open , and the raised petals were just about the right size to ensure a good finish pretty easily .
On the more recent green book , I did try a different gold . For the past several years I have been mostly using a French pale 22 carat , on new work . This was originally because i found the shade more appealing , but later it became clear that it is actually easier to use , than the fine stuff.I did try some years ago , the 24carat fine gold that Talas has , but found it incredibly delicate and prone to cracking , and flying around , etc! But , guess what , another 4 day turnaround , and i`m out of pale , ...I`ve got plenty of fine though , so I gave it a shot , and it came out.
Yes , the 24 carat is more delicate(seems lighter , poss.due to not being mixed with alloy) , and it did require some repair work , but it came out just as good.
In the little I have learnt and understand about working with gold in the past five years , it`s all about confidence(positive action) , and confidence can only be gained by experience , and experience is only gained by failure....lots of failure...
But its just like the cliche
How do you get to Carnegie Hall
practise , practise , practise (sorry !!!it was just too easy)