This post first appeared on the DBOA blog earlier this year, I am reposting it for the members of this blog.
 Out of necessity in 2008-09, I worked hard on transforming the regular goatskin onlays I was using to decorate my boxes. I had already been working on the boxes for 3 years, and after completing a lot of regular tooled onlays, I needed to start using new techniques in order to keep the work fresh, and keep both myself and the client interested. I had done some stamped onlays, but limited the use of these for children's books, and other volumes that had distinct jacket designs. As in the set of C.S. Lewis, and boxes like the signed first edition of Camus' La Peste. However, I tend to avoid the use of plates where possible, for although they do save time and make the design process easier, they can give a box a generic machine made look. I had done lacunose on a box a few times, but that can be time consuming, and certainly not efficient when working on an edition. I needed a more inventive, artistic method to transfer an image onto goatskin, or to find new ways to work or transform the onlays.
 It was with this in mind that I began printing on goatskin, by first carving images into blocks of wood. I took some fair goat, dyed it, inked up the blocks, and pressed them onto the pre-pared skins. The first question was, "should I pare the skins first or after printing?". The next issue to overcome was the exact method of pressing in the studio, without the use of either a table-top adana, or any other hand-cranked letterpress machine, which I would later employ to great effect.
 I experimented at first with hand techniques similar to those used in Japanese wood-block printing, but found it difficult to get enough pressure. Lastly, resorting to the use of a nipping press. You can get good results using a nipping press, but it requires a deft touch. The problem with using a nipping press is that all the pressure is exerted on all points of the block at the same time, which can lead to bad bleeding. Using a cylinder is much more preferable for this reason, although even with a cylinder press its possible to bleed an image with either too much ink, or too much pressure. If you are going to try this yourself, care must be taken not to smudge away the image while pasting onto the surface. The method of pressing, and the fact that the onlay is already pared to 0.10 microns, means that the image tends to be more delicate.
I used this method quite well in Cormac Mcarthy's "Child Of God, and Budd Schulberg's"Waterfront", and some others, however having had some success with rudimentary printing on goat, decided it warranted using more complex methods.
In the next development, I made regular polymer plates (Box-Car Press), for use on a hand-cranked Vandercook cylinder press. By"regular", I mean a plate that has a positive and negative printable area. Images from distinctive jacket designs were relayed to the plate maker. With the help of friend and print artist Mindy Beloff (Intima Press)we set them up on her Vandercook. I brought both pared fair goat, and un-pared goat, and it became clear right away that we were going to get much better results more easily with the unpared goat. I need not have been concerned about the paring, as with enough skill and enough sharp blades, onlays could be comfortably pared down to .10 - 0.12 microns on the scharfix without stretching and distorting the images...mind you, it doesnt hurt to have a few spares!!!

 The next step was to see if the half-tone polymer plates I had used in the reproduction of some famous civil war photography for the endpapers of a binding of Walt Whitman's "Wrenching Times", which I was working on in 2009, would print well enough on goatskin. They did, heres a tip - ink up the plate 5-6 times before rolling over the with the goat. The results were very impressive, and a long way from the rudimentary wood block printed onlays. The half-tone plate works using a seires of small dots allowing for a variety of tones in the image, much the way older printing technologies have worked. What about running the skins throught the scharfix. No problem!, again no stretch, but always advisable to have spares. It is still possible to rub the ink off by over pasting the onlays, and if the onlay is too thin, so caution must always be heeded, but the onlays were much more stable than the wood block printed onlays of before.
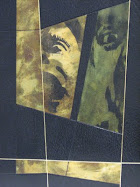
 This technique provided me with opportunity to transform the images, whether by dyeing, distorting, tooling. Its a good way to add an element to a design without too much hand tooling, but using photography printed by half-tone on goatskin can get old very quickly, if its over used , or not used in combination with other techniques, or it is not essential to the overall atmosphere of the design. In the case of the binding of "Wrencing Times", the images used not only are some of the first ever photographs to be taken in history, and some of the most expressive and famous images of the civil war era, they go well with gaylord's wood engravings inside the book. The images though, have not been used without some element of transformation, ie , they have been deliberated distorted by colouring over them, in the hope of giving them more subtlety, and have been surrounded by broken surfaces of gold leaf, to give an atmosphere of a faded, empty, and perhaps forgotten glory.
Photo-transfer, or off-set printing on animal skins for bookbinding is nothing new, but the methods I have used before in combination with acetone were in no way as effective as this last method. You do not need plates, a vandercook or proofing press, inks, or any other solvents. It is a very basic method, rudimentary, and possibly not the most tidy, or elegant method out there.....but it does work, and work well. Take an image, remembering to reverse it before printing on a high quality printer, or make a xerox copy - colour or black+white. Cover the image to be transfered with a layer of liquitex matte medium and press. If you are carfeull enough you should be able to remove the paper after drying using water and a piece of cotton. If you are too aggressive you can break the polymer bond, leaving craters, so take your time and do it in stages. This method is good for inlays or for parts of the cover that do not require movement...such as the joints and turn-ins.....as the surface will break, and so too the image....The images used for a box made for Woody Guthrie's own copy of "American Folksong", are over 12"x9" large, and the transfer is of a very good quality black and white, managing to capture all tones light to dark.
This last technique has great potential for making endpapers, doublures, or for use in covers as part of more complex collage work.
My experiments with printing on goatskin, and transforming goatskin in general will continue, and I'm sure there are many more techniques out there I could put to good use.