
 For the past 15 years I have been engaged on a single project making custom clamshell boxes for signed Modern First Editions, using many different design binding techniques such as tooling, onlays, inlays, and a variety of different methods of printing and photo transfer on leather.
These methods I briefly detailed in a previous article, basic techniques for printing on goatskin.
The motivation to explore these techniques as always was the necessity to find easy methods for introducing a design element quickly, and where applicable avoid large amounts of tooling and onlay work - primarily to save time, but they also look cool too.
Alongside these experiments, I was also looking for a way to print on leather without using blocks, mag plates, and half-tone polymer plates(all very good methods), namely photo transfer.
 Having done some rudimentary woodblock printing, I had come across a useful tool called a blender pen. This felt tip pen is loaded with Xylene, and I had been using them to transfer an image from a photocopy onto a block for carving.
After doing some initial transfers on skin with the Xylene pen, which worked fine, I quickly embarked on a determined quest to find a method that did not involve possibly damaging solvents.
So briefly I will give the pros and cons of the two methods of photo transfer that have given me the best results - none of which involve Acetone or Xylene.
1. MATTE MEDIUM
Available in all art stores, Matte Medium is basically an acrylic.
 1. Stipple matte medium onto copy.
2. Place copy face down onto area to be printed between acrylic boards with wax paper.
3. Press for 20 seconds.
4. Spray back side of the print with water, the image should show through.
5. Carefully rub fibres of the back of the paper, and gradually peel back the layers of paper.
6. take care not to be too rough and peel the image.
What you are essentially doing is gluing the image to the surface, so it's a very low-tech
solution.
Pros
quick
easy
effectively fool proof if done correctly
Cons
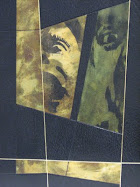
The glued area becomes stiff, making it difficult and problematic to use over areas that require flexibility, such as joints. If the area becomes cracked, the layer may peel, and nobody wants that, so avoid where possible using across the joint. This method is used best for inlays, and for images requiring great detail and half-tones.
 2. PAPER LITHOGRAPHY

This method basically turns your copy into a printing plate, making it able to be used over joints as only the ink adheres, so while you can use it over the joints and turn-ins without cracking or risk of peeling, its still delicate, best results are achieved in high contrast and black and white images.
1. Mix Gum Arabic with water in a 12oz bottle in a 1-1 or 50-50 solution.
2. Paste solution onto an acrylic board and place copy print side up on board.
3. Paste solution over the print, removing all bubbles making sure copy is pasted onto board
4. Sponge off plate with water, let dry for a few minutes, and brush over more solution.
 5. Repeat 2 times before applying ink
6. Ink plate after 5 minutes.
7. Remove any ink in the white areas with sponge and water.
8. Repeat 2 more times.
9. Peel up the copy, place it on leather and press for a few minutes, remove and peel before it dries.
Best results achieved in either method are made using smooth skins.....so regular goat is not so good, but smooth goat and calf can be used in any and all printing and transfer techniques to great affect, the longer any printing dries the better, and calfskin works very well with ink.
Thats all folks !


2 comments:
Printers like the Epson R2400 allow prints to be made on thick material. It allows a flat feed option. Just temporarily mount the leather on a board and you're off. Full color or monochrome.
sounds good - the leather is about 0.6-0.8mm thick. temporarily mount ? with tape ...you cant glue it as you need to keep the other side clean - it gets glued later...... is there a format size restriction ? the printer is only so big so might restrict if you want to do larger skins ...but yeah if you got a spare 1200 why not
might work good for small inlays
Post a Comment